JetpackComposeを既存のプロジェクトで試す
こちらを参考にしながらとりあえず触ってみました.
- まずはセットアップ
こちらを参考にbuild.gradleに変更を加えていきます...が先に言っておくとうまく動きませんでした笑 developer.android.com
Could not find method buildFeatures() for arguments...
私の場合まずは以下のエラーが出ました.
gradleのバージョンがよろしく無かったようですので, projectのbuild.gradleとgradle-wrapper.properties に変更を加えます.
classpath 'com.android.tools.build:gradle:4.2.0-alpha10'
distributionUrl=https://services.gradle.org/distributions/gradle-6.6.1-bin.zip
これでsyncに成功しましたが以下のエラーがでてきてビルドに失敗します.
e: java.lang.IncompatibleClassChangeError: Found interface org.jetbrains.kotlin.backend.common.extensions.IrPluginContext, but class was expected
試行錯誤して, 結局こうなりました... devじゃなく, alpha版をつかったり, その他諸々dependenciesに追加しています.
projectのgradleはこちら.
// Top-level build file where you can add configuration options common to all sub-projects/modules.

buildscript {
    ext.kotlin_version = '1.4.0'
    ext.compose_version = '1.0.0-alpha01'
    repositories {
        google()
        jcenter()
    }
    dependencies {
        classpath 'com.android.tools.build:gradle:4.2.0-alpha10'
        classpath "org.jetbrains.kotlin:kotlin-gradle-plugin:$kotlin_version"
        // NOTE: Do not place your application dependencies here; they belong
        // in the individual module build.gradle files
    }
}

allprojects {
    repositories {
        google()
        jcenter()
        maven { url 'https://dl.bintray.com/lisawray/maven' }
    }
}

task clean(type: Delete) {
    delete rootProject.buildDir
}
appのgradle. 既存プロジェクトに使用しているライブラリも含まれています.
apply plugin: 'com.android.application'

apply plugin: 'kotlin-android'

apply plugin: 'kotlin-android-extensions'

android {
    compileSdkVersion 29
    buildToolsVersion "29.0.0"
    defaultConfig {
        applicationId "wally.wally.android_practice"
        minSdkVersion 23
        targetSdkVersion 29
        versionCode 1
        versionName "1.0"
        testInstrumentationRunner "androidx.test.runner.AndroidJUnitRunner"
    }
    buildTypes {
        release {
            minifyEnabled false
            proguardFiles getDefaultProguardFile('proguard-android-optimize.txt'), 'proguard-rules.pro'
        }
    }
    dataBinding {
        enabled true
    }
    androidExtensions {
        experimental = true
    }
    viewBinding {
        enabled = true
    }
    buildFeatures {
        compose true
    }


    compileOptions {
        sourceCompatibility JavaVersion.VERSION_1_8
        targetCompatibility JavaVersion.VERSION_1_8
    }

    kotlinOptions {
        jvmTarget = "1.8"
    }

    composeOptions {
        kotlinCompilerVersion "1.4.0"
        kotlinCompilerExtensionVersion = '1.0.0-alpha01'
    }
}


tasks.withType(org.jetbrains.kotlin.gradle.tasks.KotlinCompile).configureEach {
    kotlinOptions {
        jvmTarget = "1.8"
        freeCompilerArgs += ["-Xallow-jvm-ir-dependencies", "-Xskip-prerelease-check"]
    }
}

dependencies {
    implementation fileTree(dir: 'libs', include: ['*.jar'])
    implementation "org.jetbrains.kotlin:kotlin-stdlib-jdk7:$kotlin_version"
    implementation 'androidx.appcompat:appcompat:1.1.0'
    implementation 'androidx.core:core-ktx:1.2.0'
    implementation 'androidx.constraintlayout:constraintlayout:1.1.3'
    testImplementation 'junit:junit:4.12'
    androidTestImplementation 'androidx.test.ext:junit:1.1.0'
    androidTestImplementation 'androidx.test.espresso:espresso-core:3.2.0'
    implementation 'com.google.android.material:material:1.2.0-beta01'
    implementation "org.jetbrains.kotlin:kotlin-stdlib:$kotlin_version"
    def groupie_version = "2.8.0"
    implementation "com.xwray:groupie:$groupie_version"
    implementation "com.xwray:groupie-kotlin-android-extensions:$groupie_version"
    implementation "com.xwray:groupie-viewbinding:$groupie_version"
    // ここからしたが追加したもの
    implementation "androidx.compose.runtime:runtime:$compose_version"
    implementation "androidx.compose.ui:ui:$compose_version"
    implementation "androidx.compose.foundation:foundation-layout:$compose_version"
    implementation "androidx.compose.material:material:$compose_version"
    implementation "androidx.compose.material:material-icons-extended:$compose_version"
    implementation "androidx.compose.foundation:foundation:$compose_version"
    implementation "androidx.compose.animation:animation:$compose_version"
    implementation "androidx.ui:ui-tooling:$compose_version"
}
- UIを作る!
めっちゃ簡単でした. 以下は最終的な1つのアクティビティです.
import android.os.Bundle
import androidx.appcompat.app.AppCompatActivity
import androidx.compose.foundation.Text
import androidx.compose.runtime.Composable
import androidx.compose.ui.platform.setContent
import androidx.ui.tooling.preview.Preview

class JetpackComposeActivity : AppCompatActivity() {
    override fun onCreate(savedInstanceState: Bundle?) {
        super.onCreate(savedInstanceState)
        setContent {
            Greeting("Hello world!")
        }
    }
}

@Composable
fun Greeting(name: String) {
    Text(text = "Hello $name!")
}
Previewを見ることもできます...!感動.

成果物はこちらからご覧いただけます
AWSの監視入門したのでCloudWatchについてメモする
最近こちらのハンズオンをちらほら進めております.
今日は監視編をやってみましたが, CloudWatchって色々機能あって驚いたのでメモしておきます. 全て網羅しているわけではないです.
まとめ
| サービス | 用途 | 備考 |
|---|---|---|
| メトリクス | ちょい調べたい ときに使える | |
| ロググループ | インサイトでクエリの対象になる. mysqlでいうテーブル的な. | ロググループへログを集める設定が別途必要 |
| インサイト | クエリ書いてログをより好きなように見れる.(4xx系のエラーだけにフィルタしたり) | |
| アラーム | 何か異常起きたら知らせれる. | SNS使って知らせると楽ちん |
| ダッシュボード | ダッシュボード |
メトリクス
リソースのメトリクスをぽちぽち選んで見れる. Redash的なダッシュボードではなく, そのときに見たいものを見るような用途で使いそう.
Redashみたいなダッシュボードが欲しい場合は, ダッシュボード という別の機能を使える.
ロググループとインサイト
ロググループ に対して各アプリケーションはログを吐き出す.
EC2とかが吐き出したログは勝手にCloudWatchで見れるようになるが, ロググループを指定するのはルールとか, cloudwatch agentが関係してきそうだけどそのへんはまだ分からない.
インサイト ではクエリを書いてそのログを好きなように加工して見れる.
アラーム
EC2が死んだときとか, CPUの使用量が増えたときなどにアラームを出せる. アラームの出す先はSNSっていうサービスを使ったり, Lambda使ったりできる.
ダッシュボード
今まで見てきたようなメトリクス, インサイトを常にまとめて見たいときに使える.Redash的なやつ.
次はちゃんと稼働してるサービスの監視設定したい. あともうちょっと何にお金がかかって何にお金がかからないのかを調べて追記したい.
Groupieでclickイベントを実装する
Groupieでのレンダリングは前に実装したんですが, Groupieでレンダリングしたリストに対してClickListenerをつけていきたいと思います. github:
interfaceとAdapterを用意する
クリック時の振る舞いはinterfaceとしてAdapterに渡してあげます. adapterは受け取ったinterfaceをListのそれぞれのItemに更に渡してあげる感じです.
用意するinterfaceはこんな感じです. 今回はMainActivityの中に作りました
interface MainListItemClickListener {
        fun onItemClick(
            itemId: String
        )
}
adapterはGroupAdapterを継承します. この時, GroupieでレンダリングするItemにlistenerを渡してあげます
class ListAdapter(private val listener: MainActivity.MainListItemClickListener) :
    GroupAdapter<GroupieViewHolder>() {
    fun updateList(list: List<MainActivity.Item>) {
        update(list.map {
            TopListItem(
                text = it.text,
                itemId = it.itemId,
                listener = listener
            )
        })
    }
}
TopListItemはこんな感じです. itemIdは, クリックしたときにどのitemがクリックされたかを判別するために用意してます. IntでもStringでも何でもOKです.
class TopListItem(
    private val text: String,
    private val itemId: String,
    private val listener: MainActivity.MainListItemClickListener
) : BindableItem<ItemTopListBinding>() {
    override fun getLayout() = R.layout.item_top_list

    override fun bind(viewBinding: ItemTopListBinding, position: Int) {
        viewBinding.button.text = text
        viewBinding.button.setOnClickListener {
            listener.onItemClick(
                itemId = itemId
            )
        }
    }

    override fun initializeViewBinding(view: View): ItemTopListBinding {
        return ItemTopListBinding.bind(view)
    }
}
intefaceの中身を実装
onCreate関数の中でadapterを生成します. このときにinterfaceの中身を実装します. 無名クラスを使いました.
override fun onCreate(savedInstanceState: Bundle?) {
        super.onCreate(savedInstanceState)
        binding = DataBindingUtil.setContentView(this, R.layout.activity_main)
        val adapter = ListAdapter(object : MainListItemClickListener {
            override fun onItemClick(itemId: String) {
                itemClickHandler(itemId)
            }
        })

        binding.recyclerView.adapter = adapter
}

 private fun itemClickHandler(itemId: String) {
        when (itemId) {
            VIEW_A -> {
                val intent = Intent(this, ViewAActivity::class.java)
                startActivity(intent)
            }
            VIEW_B -> {
                val intent = Intent(this, ViewBActivity::class.java)
                startActivity(intent)
            }
        }
    }
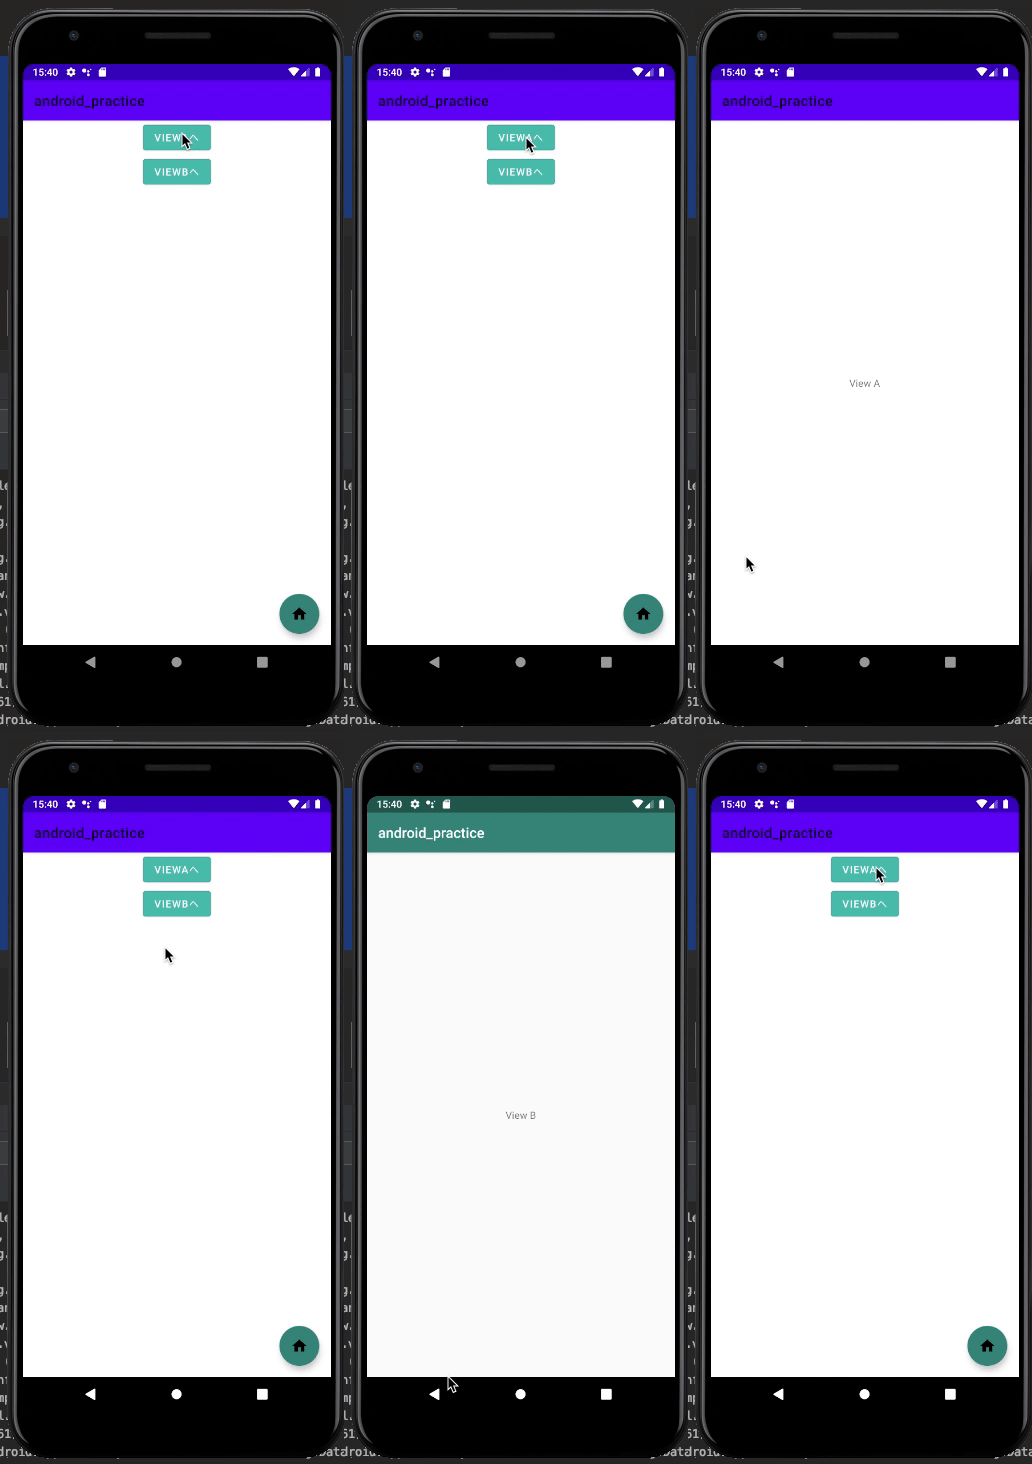
最終的にはこんな感じで動作します.
raspberry piで.Net Core3.0 を動かす
raspberry piで.Netを動かしたいときのセットアップをまとめました.
apt install -y libunwind8 gettext
curl -sSL -o dotnet.tar.gz https://download.visualstudio.microsoft.com/download/pr/4a44d4d2-19c1-485a-8b58-fa06805cddcf/cc805a1ebd9d72099309dcd46492d36f/dotnet-sdk-3.0.103-linux-arm.tar.gz
mkdir -p /opt/dotnet && tar zxf dotnet.tar.gz -C /opt/dotnet
ln -s /opt/dotnet/dotnet /usr/local/bin
ラズパイの中で, dotnet使ってビルドすると結構時間がかかりますが, ちゃんと動きますね :+1:
参考
RaspberryPiのセットアップ(インストールからSSH接続まで)
1. OSのイメージをダウンロード
今回はRaspberry Pi OS (32-bit) Lite をダウンロードしました.
2. SDカードに書き込む
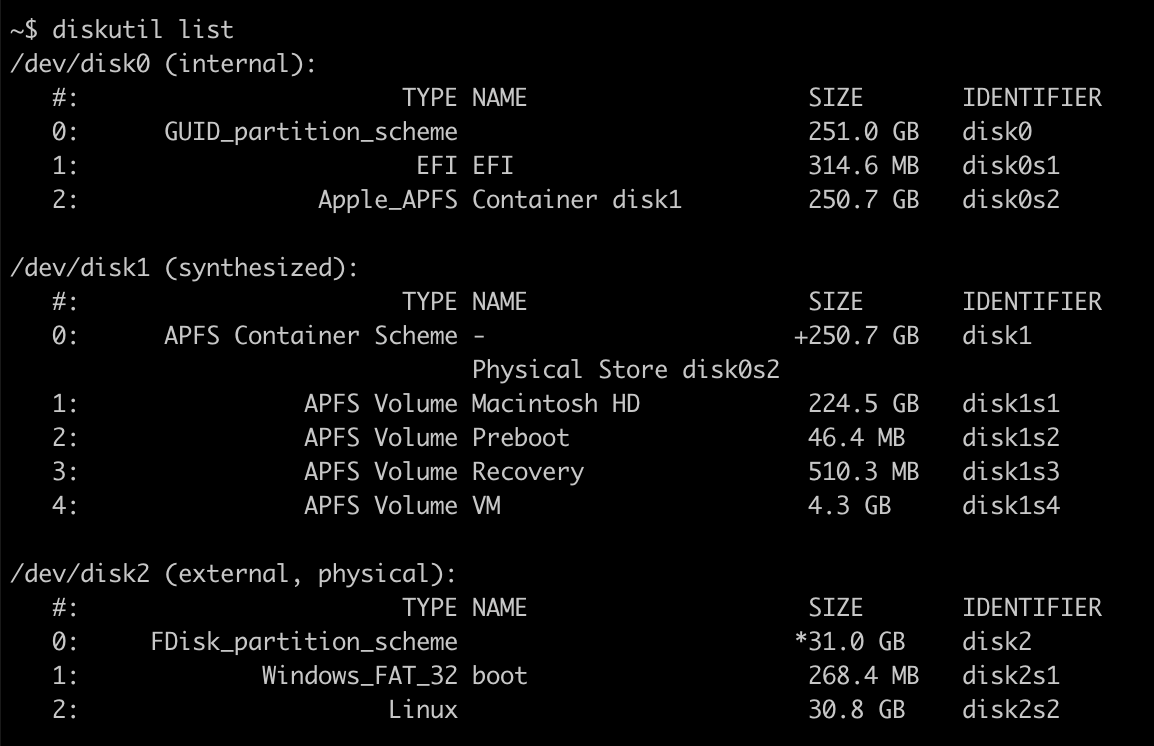
diskutiコマンドでSDカードのデバイスファイル名を調べます
diskutil list
私の実行結果

disk2に対してddコマンドで書き込みを行います.
sudo dd bs=1m if=2020-05-27-raspios-buster-lite-armhf.img of=/dev/rdisk2
3. ラズパイのセットアップ
ラズパイとディスプレイ, キーボードを繋げて設定をしていきます.
CUIのOSをインストールしたので, CUIの流れで説明していきます.
最初のログイン
以下でログインできます.
user名: pi
password: raspberry
Wi-Fiの設定
sudo raspi-config
Network Options => Wireless LAN で, SSIDとパスワードを入力します.
SSHできるようにする
sudo raspi-config
Interface Options => SSH でenalbleにします.
ホスト名の設定
毎回IPアドレスを入力してSSHするのは面倒なのでホスト名の設定を行います.
avahi-daemon をインストールします.
sudo apt update
sudo apt install -y avahi-daemon
/etc/hostname をいじってホスト名を設定します. 以下はhostnameファイルの中身です. ただホスト名を書けばOKです.
YOUR_HOST_NAME
デーモンを再起動させて確認
/etc/init.d/avahi-daemon restart
これで, 後は以下のようなコマンドでsshできるようになります
ssh pi@YOUR_HOST_NAME.local
番外編ruby setup
今回セットアップしたOSにはrubyが入っていませんので, 自分でインストールしていきます.
sudo apt install -y git
sudo apt install -y libreadline-dev build-essential clang libboost-all-dev openssl libssl-dev
git clone https://github.com/rbenv/rbenv.git ~/.rbenv
cd ~/.rbenv && src/configure && make -C src
echo 'export PATH="$HOME/.rbenv/bin:$PATH"' >> ~/.bashrc
echo `eval "$(rbenv init -)”` >> ~/.bashrc
source ~/.bashrc
rbenv -v
git clone https://github.com/rbenv/ruby-build.git ~/.rbenv/plugins/ruby-build
~/.rbenv/plugins/ruby-build/install.sh
rbenv install 2.7.1
rbenv global 2.7.1
rbenv rehash
create-react-app+TypeScriptでeslintを実行する
create-react-appには既にeslintが入っているようですが, eslintrcでルールを管理したいですよね.
どうやって回すかをまとめます.
1. eslintのダウンロードし
グローバルなところへeslintをインストールしてもいいですが, 今回はプロジェクト配下にダウンロードします.
yarn add --dev eslint
2. eslintの初期設定
yarn eslint init
ここで, eslint init とするとグローバルなeslintを使用することになります. どちらでも構いませんが今回はプロジェクト配下のeslintを使うようにします.
対話形式に答えていくと, .eslintrc.js or .eslintrc.json or '.eslintrc.yml' のどれかが自分が選んだ形式に従って作成されます.
また, 最後にnpmでパッケージを諸々ダウンロードするか聞かれます. 「yes」で大丈夫ですが, その後必ず package-lock.json は削除しておきましょう.
3. eslintのルールを設定する
こちらを参照にして, package.jsonから一部を削除して, eslintrc.jsには追記をしていきます. kic-yuuki.hatenablog.com
最終的な私のpackage.jsonとeslintrc.jsは以下のようになりました.
{
  "name": "app",
  "version": "0.1.0",
  "private": true,
  "dependencies": {
    "@testing-library/jest-dom": "^4.2.4",
    "@testing-library/react": "^9.3.2",
    "@testing-library/user-event": "^7.1.2",
    "@types/jest": "^24.0.0",
    "@types/node": "^12.0.0",
    "@types/react": "^16.9.0",
    "@types/react-dom": "^16.9.0",
    "react": "^16.13.1",
    "react-dom": "^16.13.1",
    "react-scripts": "3.4.1",
    "typescript": "~3.7.2"
  },
  "scripts": {
    "start": "react-scripts start",
    "build": "react-scripts build",
    "test": "react-scripts test",
    "eject": "react-scripts eject",
    "lint": "$(npm bin)/eslint -c ./.eslintrc.js 'src/**/*.{ts,tsx}'",
  },
  "browserslist": {
    "production": [
      ">0.2%",
      "not dead",
      "not op_mini all"
    ],
    "development": [
      "last 1 chrome version",
      "last 1 firefox version",
      "last 1 safari version"
    ]
  },
  "devDependencies": {
    "@typescript-eslint/eslint-plugin": "2.x",
    "@typescript-eslint/parser": "2.x",
    "babel-eslint": "10.x",
    "eslint": "6.x",
    "eslint-config-react-app": "^5.2.1",
    "eslint-plugin-flowtype": "4.x",
    "eslint-plugin-import": "2.x",
    "eslint-plugin-jsx-a11y": "6.x",
    "eslint-plugin-react": "7.x",
    "eslint-plugin-react-app": "^6.2.2",
    "eslint-plugin-react-hooks": "2.x"
  }
}
module.exports = {
  env: {
    browser: true,
    es2020: true,
  },
  extends: [
    "eslint:recommended",
    "plugin:react/recommended",
    "plugin:@typescript-eslint/recommended",
  ],
  parser: "@typescript-eslint/parser",
  parserOptions: {
    ecmaFeatures: {
      jsx: true,
    },
    ecmaVersion: 11,
    sourceType: "module",
  },
  settings: {
    "import/resolver": {
      node: {
        paths: ["src"],
        extensions: [".js", ".jsx", ".ts", ".tsx"],
      },
      "babel-module": {
        root: ["./src/"],
      },
    },
  },
  plugins: ["react", "react-app", "react-hooks", "@typescript-eslint"],
  rules: {
    semi: ["error", "always"],
    quotes: ["error", "double"],
    "react/prop-types": [0],
    "react-hooks/rules-of-hooks": "error",
    "@typescript-eslint/no-unused-vars": "error",
    "no-unused-var": 0,
    "no-undef": "off",
    "no-use-before-define": ["off"],
    "@typescript-eslint/no-use-before-define": ["off"],
    "@typescript-eslint/explicit-function-return-type": ["off"],
  },
};
いくつか必要なプラグインをダウンロードする必要があるので, package.jsonのdevDependencies の中身をすべてご自身のpackage.jsonへコピーし, yarn コマンドで必要なライブラリをダウンロードすると同じ環境になります.
4. eslintを回す
設定ファイルと参照先を指定してeslintを回します
yarn eslint -c ./.eslintrc.js 'src/**/*.{ts,tsx}'
毎回これを書くのは面倒なので, package.jsonにコマンドを書きましょう
 "scripts": {
    "start": "react-scripts start",
    ....,
    "lint": "$(npm bin)/eslint -c ./.eslintrc.js 'src/**/*.{ts,tsx}'"
  },
これでいい感じにeslintが回ってくれます.
過去のコミットにタグを付けてgithubに反映させる
アプリのリリースのたびにリリースタグを付けています.
タグをつけ忘れたんですが, 過去のコミットIDに対してタグを付けて, タグ情報だけPUSHできるそうなので方法をまとめます.
1. コミットに対してタグを付ける
タグを付けるコマンドはこちら
git tag tab_name commit_id
githubからタグをつけたいコミットを探して, コミットIDをコピーしましょう〜
2. タグをPUSHしてgithubにも反映させる
タグつけただけだとgithubでは見れないので, タグをPUSHする必要がある模様です.
以下でできるそうです.
git push origin tag__name
めちゃ簡単でした.
